How to Glue Aluminum Foil to Wood
Introduction
In this comprehensive guide, we’ll delve into the intricate yet essential art of bonding aluminum foil to wood surfaces. Whether you’re crafting a unique DIY project or tackling a practical repair, mastering this process is crucial for achieving lasting results. The importance of selecting the right method cannot be overstated; it’s the linchpin that holds your creation together, quite literally. From enhancing the aesthetics of furniture to sealing and protecting wooden surfaces, the possibilities are as limitless as your imagination. By following our step-by-step instructions and employing the correct adhesive technique, you’ll unlock the potential to seamlessly fuse these two distinct materials. Get ready to embark on a journey where creativity meets craftsmanship, and discover the transformative power of aluminum foil bonded to wood.
Materials Needed
Before diving into the intricate process of bonding aluminum foil to wood, it’s crucial to gather all the necessary materials. From the aluminum foil itself to the adhesive that will ensure a strong and durable bond, each component plays a vital role in the success of your project. Having a comprehensive list of supplies at your fingertips sets the stage for a smooth and efficient workflow, sparing you the frustration of interruptions or delays. By ensuring you have everything you need upfront, you can approach the task with confidence and focus, knowing that you’re fully equipped to tackle any challenges that may arise. So, gather your materials, prepare your workspace, and get ready to embark on a rewarding journey of craftsmanship and creativity.
Preparation of Surfaces
Before you begin the delicate process of bonding aluminum foil to wood, it’s essential to prepare the surfaces meticulously. Both the aluminum foil and the wood surface must be pristine to ensure a strong and lasting bond. Cleaning these surfaces not only removes dirt and debris but also eliminates any barriers that might hinder adhesion. Imagine it as laying the foundation for a sturdy structure; a clean surface provides the ideal canvas for your adhesive to work its magic. To achieve this level of cleanliness, we’ll share expert tips and techniques to banish dust and debris effectively. With these preparations in place, you’ll set yourself up for success, ensuring that every subsequent step of the process unfolds seamlessly.
Application of Adhesive
When it comes to bonding aluminum foil to wood, selecting the right adhesive is paramount for achieving a secure and durable connection. In this section, we’ll explore the various types of adhesives specially formulated for this task, each offering unique advantages and applications. Whether you opt for epoxy, construction adhesive, or contact cement, understanding the characteristics of each adhesive type will empower you to make an informed choice. Additionally, we’ll provide step-by-step instructions to guide you through the application process with precision and confidence. By mastering the art of applying adhesive to surfaces, you’ll unlock the potential to seamlessly fuse aluminum foil to wood, transforming your creative visions into tangible realities.
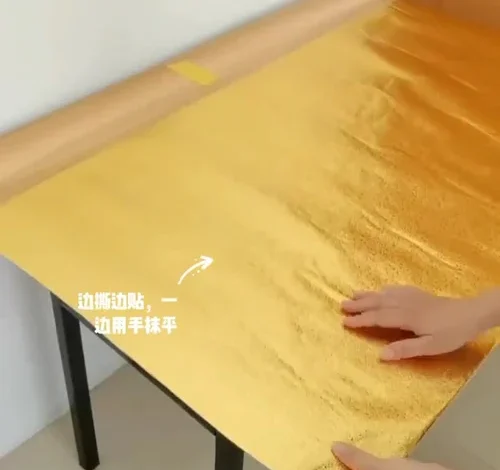
Positioning and Pressing
In this crucial phase of bonding aluminum foil to a wood surface, mastering proper positioning and applying even pressure are the keys to success. We’ll explore a range of techniques designed to ensure precise alignment of the aluminum foil on the wood surface, guaranteeing a flawless result. From aligning edges to smoothing out any wrinkles or bubbles, these techniques will help you achieve a seamless bond that enhances both appearance and durability. Equally important is the application of consistent, even pressure across the entire surface, which maximizes the contact between the foil and wood, facilitating a robust and enduring connection. By honing these skills, you’ll elevate your craftsmanship to new heights, transforming ordinary projects into extraordinary creations.
Drying Time and Final Steps
In the final stages of bonding aluminum foil to wood, patience becomes paramount as we emphasize the importance of allowing the adhesive to fully dry. This critical step ensures the integrity and longevity of the bond, providing a solid foundation for your project’s success. We’ll delve into the significance of giving the adhesive adequate time to cure, preventing premature disturbances that could compromise the integrity of the bond. Additionally, we’ll explore optional steps for those seeking to take their project to the next level, including sealing the foil to enhance both its durability and aesthetic appeal. By embracing these final steps with diligence and care, you’ll ensure that your creation stands the test of time, leaving a lasting impression for all to admire.
Conclusion
In wrapping up our guide on bonding aluminum foil to wood, let’s recap the essential points we’ve covered. First off, we learned the importance of gathering all the necessary materials before starting, ensuring a smooth and hassle-free process. Then, we explored the crucial steps of cleaning the surfaces and selecting the right adhesive, laying the groundwork for a strong and durable bond. Next, we discussed techniques for positioning the foil and applying even pressure, guaranteeing a seamless connection between the two materials.
Now, as you embark on your own aluminum foil and wood bonding journey, remember to allow ample time for the adhesive to dry completely. This final step is key to ensuring the longevity and reliability of your project. Additionally, consider sealing the foil for added durability and aesthetic appeal.
So, dear reader, don’t hesitate to give this method a try yourself! With a bit of patience and attention to detail, you’ll be amazed at the results you can achieve. Whether you’re crafting a unique piece of art or making practical repairs around the house, the possibilities are endless. So grab your materials, roll up your sleeves, and let your creativity shine!penguintalks.com